Thursday, January 14, 2010

Helping Haiti

Like so many people around the world, I have looked at pictures, watched videos, and read reports coming out of Haiti over the last couple of days. The feeling of helplessness is unbearable and I have donated what money I can (Here's a reputable list of charities you can donate to- If you know of others, please link to them in the comments.)

But as a crafter, the urge to DO something is so strong. I can't go to Haiti myself, so I've been searching for ways I can do something more concrete than sending off a few dollars. Here are a few things I've found, and I thought I'd share them in case you'd like to do something too. Granted, most of the funds raised through these efforts will be going to the same places as your $5 or $10 dollar text message donations, but these support the crafting community at the same time. I will add more options as I find them.

Donate something hand made to the Craft Hope Etsy shop. "The Craft Hope Etsy shop will allow crafters to donate products and allow folks to purchase them. With 100% of the proceeds going to charity." Not a crafter yourself? Check out the shop and buy something.

Shop at Indie Fixx's Haiti Relief Fundraiser Auction.

If you happen to be in the NYC area and can be in Brooklyn on Monday, here's an event you could help out with. "Volunteers will learn to sew to create wrap skirts for women and children who have been devastated by the earthquake... Volunteers who can sew, cut, fold fabric, pack boxes and enjoy working together should come to our studio!"

AP Photo/Gerald Herbert - A Spanish rescuer carries two-year-old Redjeson Hausteen after he was rescued from a home that collapsed during Tuesday's earthquake in Port-au-Prince, Haiti, Thursday, Jan. 14, 2010. © All rights reserved.

As I've mentioned before, I loved babywearing my girls. I'm a huge advocate of the benefits of babywearing, and I love to support the babywearing community. Many vendors have put together raffles to raise funds for Haiti. If you win and don't have a child to wear, you could donate the sling to a local babywearing or breastfeeding advocacy group, or to a women's shelter, thus doubling your giving!

Sleeping Baby Productions
is raffling off three ring slings. All proceeds will go to the International Red Cross.

Piece of Cloth has three wraps and one custom dye job up for their raffle.

Sweet Pickles is donating 5% of profits from all January sales. They are also researching ways to get babywearing and breastfeeding information into Haiti.

McKinley Kidz is raffling off a $100 gift card. Proceeds will be split between UNICEF and Partners in Health.

QuirkyBaby is raffling off a $100 gift card with proceeds going to Doctors Without Borders.

I will add to this list as I find more options, please share any reputable charitable opportunities you know of in the comments.

ADDED 1/15
Here are some adorable tie dyed onesies by Frugal Adeline- Kindred Crafters is paying the shipping, so 100% of the proceeds will go to Haiti.

Zerberts is currently donating 10% of their profits to disaster relief.

Hotslings will be donating 50% of all online retail sales MONDAY January 18 to The Red Cross for Haiti.

Mama by Design
: For
every Calyx baby carrier ordered between Monday Jan.11 through Monday, Jan. 18, $5 will go to Mercy Corps for their Haiti relief effort.

Sunday, January 10, 2010

Anna Maria Horner's Multi-Tasker Tote


Trick or treat? When I was waaay too far into this project to turn back, it occurred to me that this might be a little too orange and black... I asked my hubby and he said it did look a little Halloween-ish. But I plowed through and it's growing on me! This is the Anna Maria Horner Multi-Tasker Tote, and I used Ikea home decorator weight fabric for the exterior and pocket panels.

This was one of the first patterns I've made that I really had to just trust in the directions and sort of sew blind at some points. Usually I can see the "why" of a given step in a project, but at times, with this bag, I was sure something was going to go terribly wrong. But it never did, and I kept having light bulb moments when I saw how each step came together. That actually made this project a lot of fun, it felt like lots of little victories! I wouldn't necessarily say it's a difficult pattern, but if I'd attempted it as a complete beginner I think I would have gotten frustrated. The directions are clear and well-written, but you can't make any assumptions about what comes next, there were some definite construction differences here from the average bag.

I debated whether I needed to use interfacing since I was using a heavier fabric (and since I didn't have enough interfacing in one piece and I'd have to scrap it together!). I remembered that my friend Becky made this bag last year, so I asked her what she thought and she recommended using it. I'm glad I did, it does make for a more structured bag, although if you like slouchy or want a bag that scrunches up small you could do without if you're using a fabric with any stiffness to it.
Inside the bag.

The straps act as drawstrings on the sides of the bag, so when it's all the way open it's VERY roomy! There's a nice big pocket on the inside with a key loop. The bottom is structured with fusible heavyweight/very firm interfacing, and I think I'll really like that feature. The pattern recommends sewing some sections into the pocket and I didn't do that. It's a wide pocket and if I put my phone in there it would likely tumble out. But I'm planning to use it for my wallet and it's just the right size for that. Plus, I fussy-cut the pocket piece to show the bird and I didn't want to sew through his head! I'm odd like that. But you could sew in pen slots, a just-right-size pocket for your phone, iPod, whatever!

My favorite feature of this bag are the four deep pockets on the outside. They are the perfect size for drinks- For size reference, the picture shows a 27 oz. Klean Kanteen and a Thermos Funtainer. I could easily get two more in the other side. The pockets wrap around and have a seam down the middle. This will be perfect for the farmer's market when everyone has their own drink!

The only thing I'd change about this pattern is adding a magnetic snap or maybe a button and loop at the top. It's such a nice big bag that I'm worried it will gape when I start to fill it up. But then again, it's a tote and should be easy to toss things into! So, I'll use it for a bit and report back.


(I don't know why my pictures appear blurry here- If you click them to see the full-size version, they are clear!)

Thursday, December 17, 2009

Dear Santa: A Haiku


Dearest Santa Claus
You've always been kind to me
Even though I'm old.

For Christmas this year
Some new fabric would be "Swell."
Yes, I've been Nicey!

Maybe I could sew
Something nice for Mrs. Claus?
You've been working late.

A nice springy bag
To bring on the vacation
She so much deserves

It's hard for Mama
When Daddy works extra hours
(Assuming you've kids?)

A fat quarter pack
Of lovely Swell Nicey Jane
From Heather Bailey

Wrapped under my tree
Would be the most perfect gift
For this sleepy Mom!


Wondering why I wrote a rambling haiku?? Check out the Fat Quarter Shop's awesome Dear Santa Giveaway!!!

Tuesday, December 15, 2009

Holiday Gifts... so far!

I am so excited to be hand-making lots of Christmas gifts this year. Last year at Christmas I had just started sewing and my confidence level only extended to rice bags- Which were nowhere near as fancy as the ones in that link! But this year I am feeling more confident and am making bags, an apron, a wall quilt, some capes, oven mitts, a kid-sized Snuggie (Yes, really!), a hat/mittens/scarf set... And I am sure there's more I'm forgetting. Not exactly sure how I'm going to get all of this done, but I'll figure it out somehow!

Here are a few things I've finished or nearly finished so far! All of these are for a handmade gift swap. I don't think my swap partner reads this blog, but if she does... Um, act surprised Serena!

Oven mitts from Lotta Jansdotter's book Simple Sewing. One is for the swap and one is for ME! The fabric is an Alexander Henry Christmas print from a few years ago, "Merry Modernica." I only had a fat quarter and it was just enough, and now I wish I had more! I love the colors.


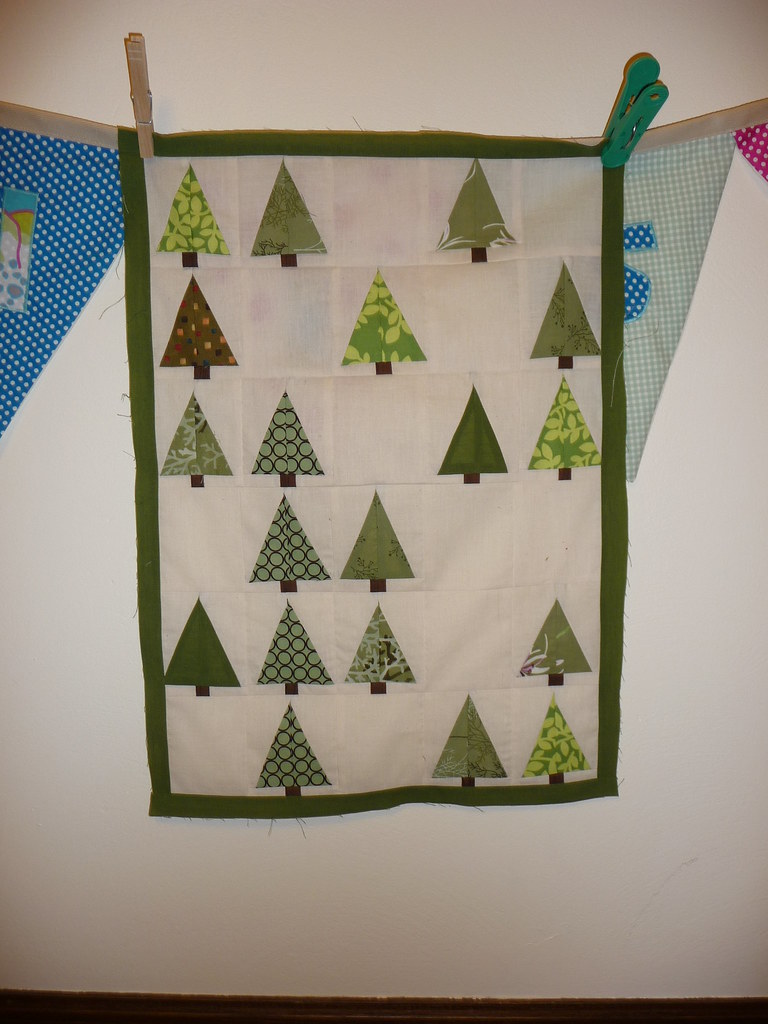
A "Little Forest" quilted wall hanging. I got the instructions from The Purl Bee and it was so fun to make! I copied their layout but did only 6 rows instead of their 8, simply because I didn't have any more green scraps I liked enough! I think it still looks nice this way. It's about 15" by 22", and it went together fairly quickly, even for a beginner like me.

So far I've only pieced the top, and I think I am going to wimp out and finish it by turning, topstitching and tying. I just can't get quilting and binding to look nice. Anyone have a favorite tutorial?

I made an apron using Butterick/See & Sew B5125. For the life of me I cannot get a good picture of it! This picture at least shows the fabrics, but I really need a dress form to get better pictures of things like this. The red is the body and the other print is the ruffle at the bottom and the ties. It's really cute, I hope she likes it!

Sunday, December 6, 2009

And the winners are...

Using the trusty old Random Number Generator, I have chosen the three winners! Thank you SO much for all the comments, I will definitely be taking your advice and sharing lots more pictures, tutorials, and detailed information. A number of people said they liked to hear about the "not-so-perfect" projects, and I can DEFINITELY share lots of stories about those!

On to the winners!!! The winning comments were:

10: Coralee of The Angry Turtle wins the black and white FQ set.
259: Greta of Because I Sew So wins the dots and floral set.
130: Lil Bean wins the Lila Tueller set.

Congratulations, winners!!!

And a HUGE thank you to Katydid and Kid for the tutorial on how to number comments! This was my first giveaway and I started manually counting comments and... well, it got old really fast!

Wednesday, December 2, 2009

Sew, Mama, Sew! Giveaway Day!!!

~~~COMMENTS ARE CLOSED~~~
Thank you SO much for all your comments!!! I will be choosing and notifying the three winners tonight!!!

I am SO excited to be participating in Sew, Mama, Sew's Giveaway Day!!! I won some nice gifties last time around so I am looking forward to sharing the love in this round.

I had a hard time deciding what to offer up for this. I decided to go through the stash and see what jumped out at me, and THREE separate bundles decided they wanted to be offered up! Three winners! Yay!

First we have a set of four black and white fat quarters.


Next, there are two coordinating fabrics, a half-yard of each. These are the same fabrics I used in Allison's First Day of School dress, and those dots are some of my all time favorites!


And finally, we have two half-yard pieces from Lila Tueller's Woodland Bloom line. I love these colors, and this fabric is SO soft!

To win, just comment on this post! I won't make you jump through any hoops, but if you're so inclined I'd love to know what you like to see in sewing blogs. My blog is not connected to a shop or anything, it's just for me to share my own little projects and cool things I see around the web. What would make this blog more interesting to you? What makes you decide to click that "Follow" button when you visit a blog? I'd be ever so happy if you'd follow my little corner of the blogosphere! Good luck and have fun visiting all the fabulous Giveaways today!

This giveaway will be open through December 6, and I'll post the winners here and e-mail them as well. Be sure to leave an email address so I can reach you! Winners will be chosen by the old fashioned names-in-a-hat method, or Random Number Generator if I don't have a willing name-drawer around when I close up the giveaway!

(Apologies for the poor pictures, I had a two year old "helping." Snowman, basket and peace sign not included!)

Sunday, November 29, 2009

I have been sewing, really I have!

I don't know why I keep forgetting to blog the projects I've been working on! But I will be participating in Sew Mama Sew's Giveaway Day on December 2, so I figured I should have something posted more recently than Halloween!

I've been going to my weekly sewing class, which I love. Tomorrow night is the last session, and I will miss it so much until it starts up again in late January! It's so nice to have dedicated time with fellow sewing enthusiasts. Not to mention the HUGE cutting tables in the classroom, and no threat of wandering toddlers waiting for an opportunity to grab the pin cushion and run.

Most of this session's classes have been taken up by my attempt at Simplicity 3673, View C.
I am using the Posey fabric from Denyse Schmidt's County Fair line, in the "raisin" color. It's the 3rd from the bottom in that link. I adore this fabric and I'm loving how this dress is turning out. I had to make a few changes to the pattern to fit my body type, and I am SO proud that I was able to do that (with a lot of help from my wonderful sewing teacher, of course!) A year ago I could barely sew a button, so this dress, though far from perfect, feels like a real accomplishment. I hope to finish it tomorrow night and I will post all the details then!

Aside from the dress, most of my sewing for the past few weeks and for the next few weeks will be Christmas related! I'm participating in a handmade gift swap at The Fabric Obsession, I've got about a dozen fleece shrugs to make for the older members of the family (and one for myself!), a pair of Princess Tiana dresses for my daughter and her BFF, a car organizer for one nephew, a pair of lap quilts for my other two nephews, bags for my mom and mother in law, appliqued t-shirts for a friend's children, and... Oh dear, how many days until Christmas??? The only Christmas gift that is completely finished is a fuchsia fairy printed Snuggie for my 4 year old!

Here is one recent finished project, with a pair of terrible pictures! This is the ModKid Julia pattern and it was so much fun to make. I am already dreaming of more fabric combinations to try with this. And best of all, the kiddo loves it!

Come back on Wednesday, December 2 to check out my giveaway and LOTS of other great giveaways through Sew Mama Sew.

Saturday, October 31, 2009

Happy Halloween!!!

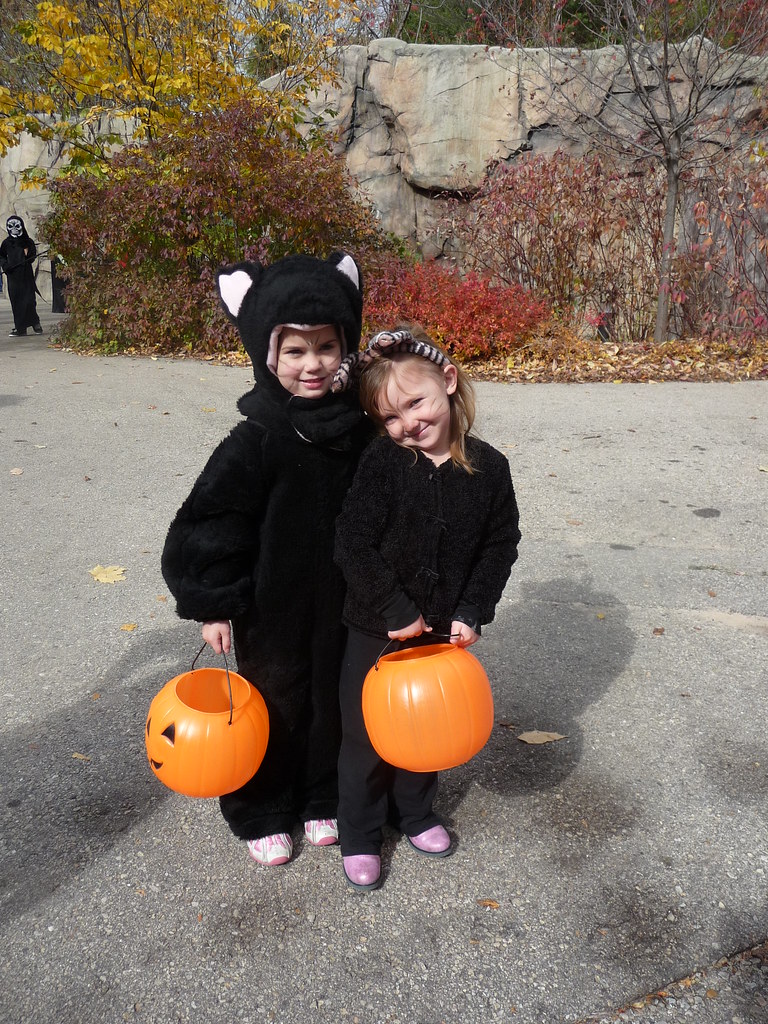
This was the first year I made a Halloween costume from scratch. I have fond memories of my mom sewing costumes for me and my brother, so I was really excited about this. Allison wanted to be a cat this year, so I set to work a few weeks ago and she LOVED her costume!

Here she is (on the left) with her friend Gracie.


And here's another shot with her sister (the pink octopus) and her cousin the ladybug! Lizzie is still young enough to wear Allison's hand me down costumes, but next year I think I will be making two costumes!

Saturday, October 17, 2009

Doll Mermaid Tail Tutorial

I've had so much fun and learned so much from all the scrapbuster tutorials over at the Sew Mama Sew blog this month, I decided to share one of my own. As I've mentioned before, my daughter Allison loves all things mermaid. She has one mermaid Barbie doll, but that mermaid got lonely with all those landlubbers around. I decided to make some tails for the other dolls so the mermaid would have some friends!


First I made a merman, then a merbaby, and now we have 6 or 7 mermaids swimming around! These take just a small bit of fabric, so they are a great quick stashbusting project. This will work for any size doll, teddy bear, or even a younger sibling. (Wouldn't that be the cutest bunting? Now I need a newborn!)

This is my first tutorial ever, so please let me know if anything needs clarification. All images are clickable to a larger version.

Start with the particular doll you are making the tail for. I noticed pretty quickly that the Barbies tend to have different body shapes. Allison's Barbies are all Disney Princesses; maybe "regular" Barbies have standard dimensions. So you need the doll, two scraps of fabric roughly 9 x 3 inches, thread and a piece of narrow elastic long enough to go around the dolls waist with about 1/2 inch of overlap. See, you can even use elastic scraps! Warning: Partial Barbie nudity ahead! (Although she does have those classy plastic undies on.)


Lay the doll on the wrong side of the fabric, with the top just above her waist and the bottom a couple of inches below her feet. Trace the doll's shape about 1/4" out from her body. Don't worry about the contours too much. When you get to the widest part of her hips, draw your tracing lines straight up from there- Don't trace her waistline or you'll never get the waistband over those hips. As you get to her feet, draw in the bottom fin shape. Just eyeball it, it's a simple shape and you can determine if you want long narrow flippers, short roundy ones, or however you like!


Your traced line is your sewing line. Now cut out the tail, leaving 1/4" or so seam allowance beyond your traced line. Sew along your traced line.

Now try the tail on your doll. Make sure you can get the tail over the hips relatively easily.
Yay! It fits!

Once you're sure the tail will fit, finish the edges. You could zig zag or serge them, but I prefer to just pink the edges to cut down on bulk at the seams.
Fold the top hem over twice, to create a casing for the elastic. I used very narrow elastic, so my casing is only about 1/4" wide. Just make your casing as wide as you need for the elastic you have on hand. Sew the casing closed, leaving a small opening to insert your elastic.

I turned my tail right side out first, I just find it easier to sew such a tiny loop that way. Do whatever works for you! When you do turn it right side out, use a turner or knitting needle to poke out the ends of the tail and edges of the "legs," then press.

Put a small safety pin in one end of your elastic and feed it through your casing.

Overlap the ends of your elastic by about 1/2" and stitch them together. I suppose you could machine sew this, but I find it easier to just do a few stitches by hand.


Sew up the opening in your waistband, et voila! A custom made (Barbie is accustomed to couture, after all!) mermaid tail for your favorite little girl's doll!

Oh look! I have a blog!

Well, look at that... It's been two and a half months since I posted! We were out of town for the entire month of August, then Allison started preschool, and the weeks just kept slipping by. But I'm back, and I'll be trying to post regularly, mainly to help me remember what I've done.

Here are a few projects I've done during my blogging absence.

Allison's first day of school was exciting for all of us. I made her a new dress with matching hair clip. I was really happy with it, and I'm glad she got to wear it once before winter decided to come to Wisconsin 2 months early!


I managed to get my Melly & Me Flower Garden bag finished before our trip, and I absolutely love it! I used Denyse Schmidt's County Fair Canvas, one of my favorite lines. Incidentally, that line is on sale for an incredible $2.99 a yard at fabric.com right now. That is a ridiculously good deal on 54" home dec weight fabric.
I made a Rocket Man for a little man's first birthday. This was so much fun to make, and I think the recipient was pleased. I had fun taking the little egg man in and out of his seat!

I participated in a couple of swaps and the girls got these ADORABLE dresses from one of my swap partners. These have become instant favorites and are worn ALL the time! And I got the most beautiful bag- The front panel is made from one of my all time favorite woven baby carriers, so it's a wonderful gift now that my babywearing days are winding down.
I love "cheater" quilt fabric- I found these fat quarters of sort of vintage looking patchwork, and decided to try another quilt top. Of course, it remains just a quilt top, because I still have a fear of binding.
That's all for now! There have been other projects, and I am currently working on Allison's Halloween costume, a few flannel nightgowns, and then I am going to tackle a dress for myself!!!